This feature provides locations a tool to request inventory from centralized warehouses and for the warehouse to release and ship the product. If product is not available at the warehouse, a Procurement team member can create a Purchase Order.
At Accounting / Inventory / Product Requests, choose Add Request.
Note: If saving a Product Request where the Product does not exist at the Requesting Location or Requested Warehouse, a prompt will display to add the product (if product sync rules are set up) or a message will display indicating the product does not exist (if product sync rules are not set up).
Header information populates to all lines in the grid but can be edited on any line.
General
When information is entered on the General tab, a prompt displays asking if this should be applied to all lines in the Product Grid. Alternatively, each of these fields can be populated in the Product Grid by line item.

- Date – This defaults to the current date.
- Req. by Date – Enter the date product is needed.
- Requesting Location – This defaults to the location currently logged into. Double-click to change. The Requesting Location cannot be the same as the Requested Warehouse.
- Requested Warehouse – Double-click to select the location from which products are being requested. This defaults to the Requested Warehouse from the previous request. The Requested Warehouse cannot be the same as the Requesting Location.
- Pickup/Delivery – Select if product(s) are to be delivered or will be picked up at the warehouse.
- Comments – Enter Comments about the request. Comments are saved with a user and date/time stamp.
- Email Notifications – Double-click the <Email Notifications> header to add emails set up by selecting Setup at Inventory / Product Requests or manually enter an email address. A Status must be indicated in order for email notifications to be sent.
Additional Info
When information is entered on the Additional Info tab, a prompt displays asking if this should be applied to all lines in the Product grid. Alternatively, each of these fields can be populated in the Product grid by line item.

Optionally enter a Freight amount, indicate Estimated Total$ or Estimated $/Unit, and choose a Freight Vendor. After products are in the grid, select Apply Freight.
Note: Currently, this information does not populate into Delivery Tickets or Purchase Orders created from Product Requests.
A Contact Name, Contact Phone, and Delivery Instructions can also be entered. Additionally, if this is a Direct Ship, select the checkbox.
A Customer and/or Ship To can be indicated for all lines.
Product Grid
Rather than applying information to all line items in the grid, each line item can be edited separately.

- Product Selection – Double-click on <Product Name> in the grid to select products and quantities for the request.
- Available to Deliver – This is a calculation of the amount available at the Requested Warehouse. This amount is not automatically calculated on Completed and Rejected requests. Select in this column on any line to calculate the Available to Deliver value on demand. The calculation is: Amt On Hand – Unloaded Delivery and Blend Tickets – Quantity on Released Product Requests = Available to Deliver
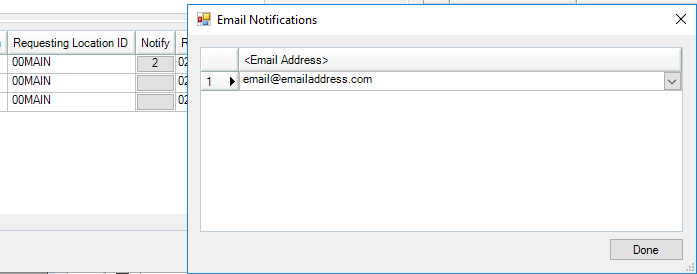
Note: When asking for the Available to Deliver value of a product with more than one product matching the selected Product ID and Department Category in the Warehouse location, a window will display with those filtered products to indicate which Department should be used. - Notify – Selecting the button in the Notify column opens the Email Notifications window where emails can be added for this specific line item by double-clicking the <Email Address> header to add a row and choosing from the drop-down (if emails have been set up here) or by entering an email address manually. The number displaying in the Notify column indicates the number of email addresses selected. A Status must be indicated in order for email notifications to be sent.

- Manufacturer – The product's Manufacturer displays in this column. It is populated from the Requesting Location product.
Note: Columns in the grid can be selected/deselected. Hover over any column heading, right-click, and select Choose Columns Alphabetically. Tag/untag items in the list to select/deselect. Select and drag columns to rearrange. After columns have been selected and arranged, hover over any column heading then right-click and select Make This Layout My Default. This remembers the grid layout for this user.

